 A long time ago, my father made a simple bench out of a scrap of 4×6″ fir. Back then, a bunch of us were racing motorcycles, and we would engage in ‘bench racing’ sessions- reviewing memorable moments from recent or famous rides- akin to the idea of the ‘Monday morning quarterback’ sessions. Straddling this rustic bench was a natural visual aid to the storytelling.
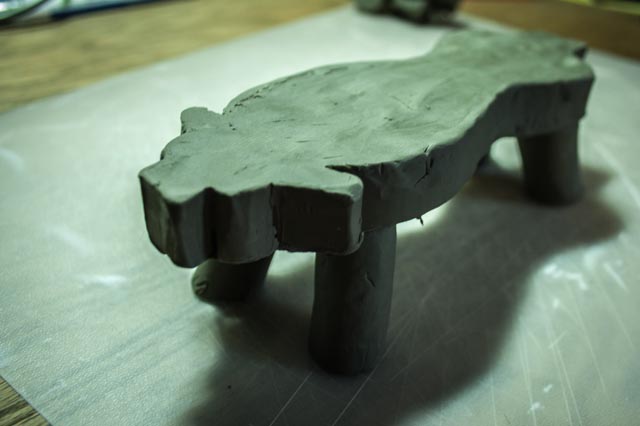
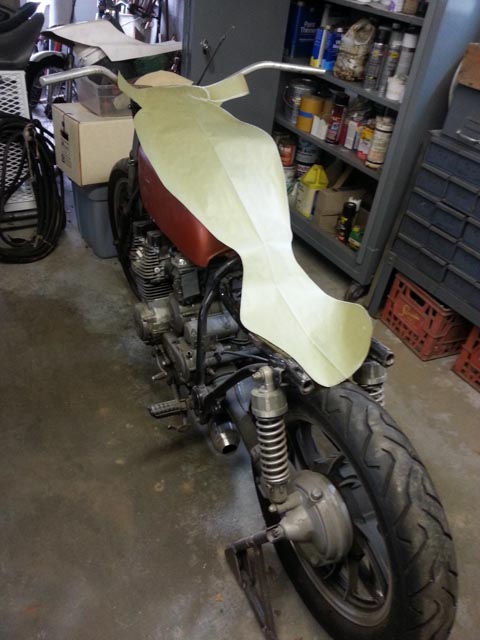
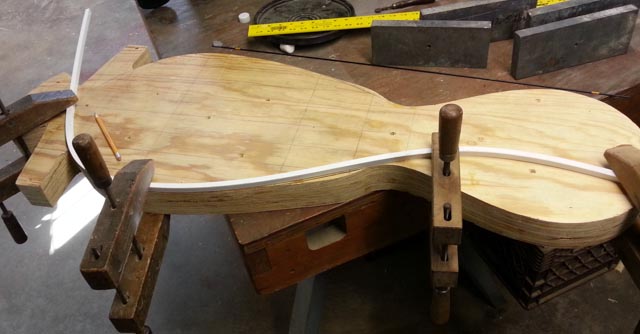


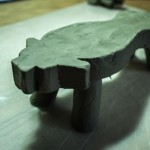
Years later, the idea came to me that it would be fun to build something that offered a visual sense of a motorcycle, while retaining the utility of a bench, or as it turns out, a coffee table. I began by fashioning a clay model, though its four legs and fender/handlebar details caused it to look more like a wild beast of some sort. By the time I got to the shop, I had refinements in mind. As a general guide. I traced an old Triumph tank onto a sheet of masking paper and sketched in a solo seat. I laid this atop a nearby project bike as a check on overall proportions.
The pattern was surprisingly contiguous with a full size motorcycle. By now, I had also removed the front and rear fender details that had given my clay model its wild animal aspect. I spent some time refining the lines; my goal was to create a suggestion of a motorcycle more so than a literal reproduction. At the same time, I wanted something that would feel ‘right’ when it was sat upon. The detailing slowly became simpler.
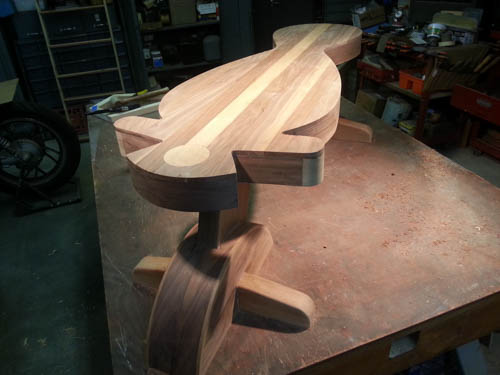
The pattern was transferred to the plywood sheets that would be laminated together to form a solid core. The four legs of the clay model were replaced with two legs of a sort of trestle design terminating in half-round ‘wheels’. The upper portion of the legs were cut into large tenons that penetrate all layers of the tabletop core except the topmost. The lower legs are sandwiched fully among the parts of the wheel. This construction offers considerable strength. After years of building things for commercial fishing boats, it’s hard to be happy with something that only looks strong. Aesthetically, I was pleased with the effect of the legs, but I would vacillate between retaining this simplicity and adding some mock-mechanical embellishment over the course of the project. Ultimately, I opted for simplicity, and even considered finishing the vertical pieces and lateral ‘feet’ in black to further remove them as visual elements.
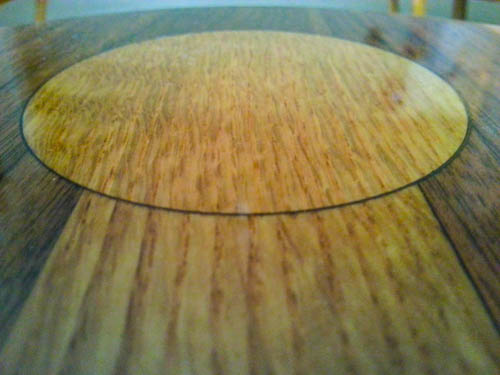
My plan was to machine veneer from some wood I had salvaged some ten years earlier. I think it’s a mahogany, but I can’t make a definite identification, so I’m sending a sample off to the experts. Regardless, I knew I would need to steam bend my veneer, especially given that the thinnest pieces that I can consistently produce are about 3/32″. I chose to leave the top closer to 3/8″ for durability, appearance and to allow a reasonable round-over radius. Several steam softened test pieces revealed that the recurve at the junction of the the ‘tank’ and ‘seat’ was too extreme, so that area was reworked with a fairing batten.
Meanwhile, I readied my veneer and cobbled together a steaming rig. It’s so easy to knock together an ad hoc rig for a small project that I can’t see the value in building and storing anything too complicated. (I plan to offer details of the steam bending setup elsewhere on this site.) A significant part of any project like this entails devising a method for clamping parts together, for holding parts in shape after steaming, and of course later, when gluing. In both cases, the need to work quickly often dictates that a complete dry-run take place before the actual operation. Irregularly shaped pieces require some creative clamping methods.
The 3/8″ thick pieces for the top were clamped together and run through the jointer as a group. Alternate pieces were flipped 180° to correct any out-of-square that might have crept in. It took some planning to keep it organized, and even so, I could have done a better job with the grain. I set up a gluing platen using some old tongue and groove flooring, constructing a ‘ladder frame’, with the tongues pointing up. Once corrected for flatness, this allowed for good support of the glued-up top with minimum contact area between work-piece and support. It sounds like unnecessary work, but I would definitely use this arrangement again. I’m sorry I don’t have a good photo of it. Epoxy, wax paper, clamps were applied as one would expect. I didn’t use the glued up top for a while, so I kept it flat under some weights, which do show in one photo.
The basic parts of the bench- top, legs and cross-feet (for lack of a better term), were all assembled with close-fitting joints that provided all the mechanical strength that can be attained via design alone. These joints were all supplemented with epoxy and screws. As I mentioned elsewhere, I’ve built deck and engine room hardware for commercial fishing boats out of wood, steel and fiberglass. This is a sturdy little table.
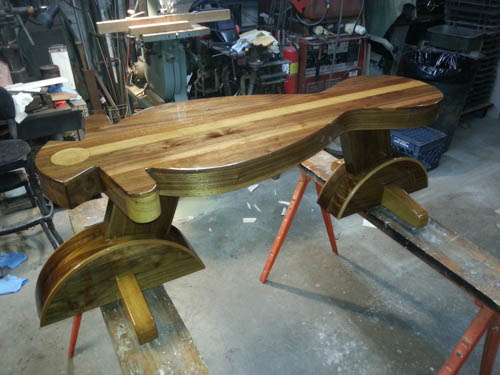
As this assembly progressed, I began applying the 3/32″ veneers, typically allowing it to run past its finished size. Curved pieces were pre-shaped using steam- experiments showed that parts would break otherwise. Clamping the veneers was challenging. Perhaps I will get around to concocting a vacuum bagging system at some point, but I knew it wasn’t going to happen in time for this project.
Trimming the veneer where it ran wild turned out to be interesting. The 3/8″ top piece responded well to a laminate trimmer, but the various curves, angles and obstructions of the rest of the bench rendered the laminate trimmer somewhere between useless and destructful. It looked like I had days of tedious hand work ahead of me.
Traditional tools turned out to be an elegant answer, however. Between a low-angle plane, an adjustable spokeshave and a few cabinet scrapers, the work was finished quickly, with exquisite control and a pleasant Zen-inducing sound and feel. In fact, I became so enamored of the cabinet scraper in particular, that no power tools of any kind- neither power plane nor electric sander- were used in finishing this bench. The top surface shows a gentle scalloping or undulation in the right light; one has to be looking for it to see it.
One detail that isn’t shown in the photos is the adjustable feet. In image #10, ‘Underside Detailing’ the sharp observer will notice 3/8″ hex bolts protruding from pockets in the ends of the legs. These serve to hold the bench clear of the worktable during the finishing process. However, when all is complete, the bolts will be replaced with adjustable, felt-bottomed, articulated furniture feet. There is a threaded brass insert at the bottom of the pocket to accept the feet, which thread into the pocket until they are just flush. This allows the bench to sit comfortably on carpet, harmlessly on hardwood, or be adjusted to accommodate a floor that is uneven up to 1/2″ or more. It’s a nice touch.
The plywood core and the veneer are different species of wood. I spent some time with the Wood Manual*, and decided that the rates of expansion might be compatible, but again, I’m not certain that I’ve identified the veneer correctly. In order to avoid any problems related to moisture related movement in the wood, I decided early on to use the WEST system to seal it. The WEST system was developed to bring wooden boatbuilding into the modern era. While WEST is a brand of epoxy, it refers to a specially developed protocol known as the Wood Epoxy Saturation Technique. The basic idea is that if a wooden structure is completely encapsulated in epoxy, moisture cannot migrate into and out of the structure, rendering it dimensionally stable. It’s been proven on large, highly stresssed structures in extremely harsh environments, so, I figured it would work here, too.
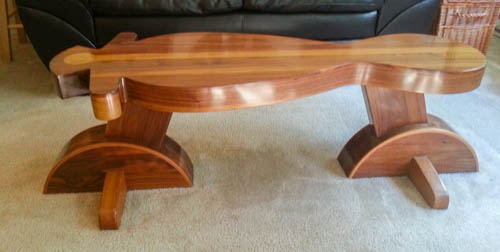
Once the layers of epoxy have been applied, it’s recommended that a traditional varnish be applied over it to provide UV protection. Okay, now it seems like overkill, but, I applied perhaps seven to eight coats of marine varnish, which I rubbed out by hand to finish seen in the photos. It’s a ton of work.
The varnish work is not quite done. There are a couple of spots that really need a little attention before it can be considered complete. Unfortunately, the house sold so quickly that I couldn’t wrap it up before packing up the shop. Nonetheless, I’m putting this in the ‘portfolio’ section, rather than consider it a ‘current project’. Makes me feel like I got something done.
* (In case you haven’t stumbled across this book, it’s called ‘Wood: a manual for its use as a shipbuilding material’, published by the US Dept of the Navy, Bureau of Ships. I inherited my copy from my grandfather, Albert.)